Question 14
Construct the following figure.
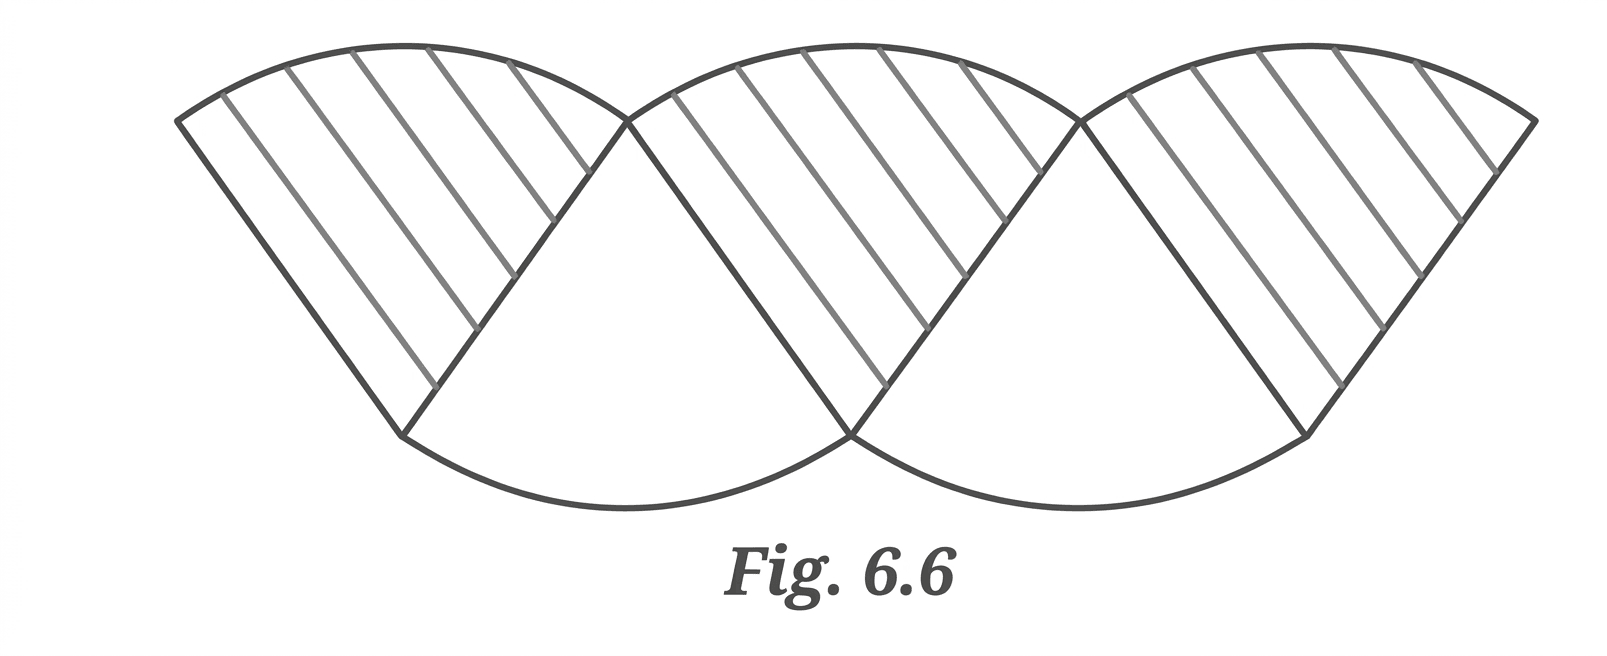
The figure is a part of a larger pattern. This larger pattern would consist of 8 identical rhombuses arranged around a central point. Each rhombus would have an angle at the center.
Let us calculate this angle. The total angle in a circle is 360 degrees. The number of rhombuses in the full pattern is 8. The angle for each rhombus is found by dividing the total angle by the number of rhombuses.
So, each rhombus in the pattern has an acute angle of 45 degrees. We will construct one such rhombus and then replicate it.
Step 1 — Constructing a 45-degree angle
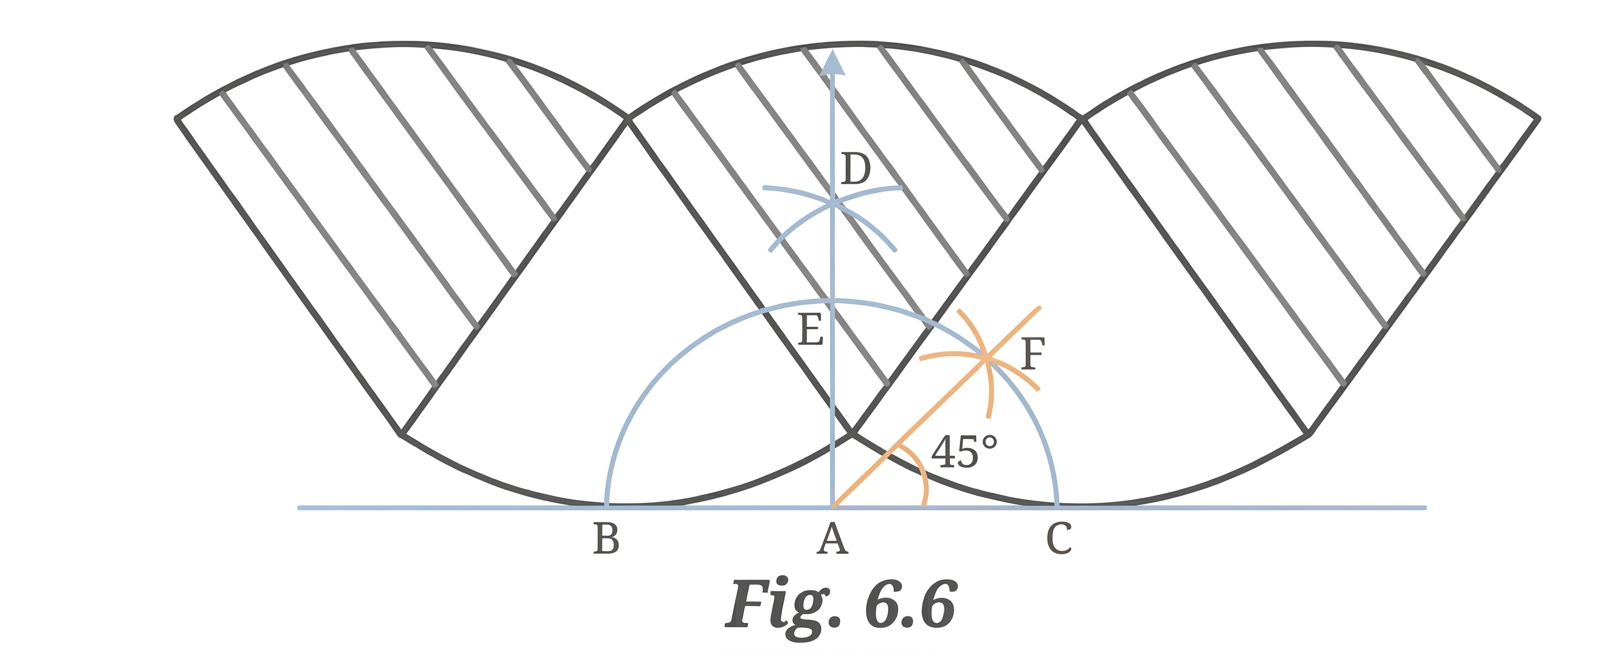
Let us start by drawing a straight line. Mark a point A on this line. This will be the common vertex for all rhombuses. With A as the center, draw a semicircle. This semicircle cuts the line at two points. Let us call these points B and C. Now, we will construct a 90-degree angle at A. With B as the center, draw an arc above the line. With C as the center and using the same radius, draw another arc that crosses the first arc. Let this intersection point be D. Draw a ray from A through D. This ray is perpendicular to the line BC. So, the angle is 90 degrees. Next, we will bisect this 90-degree angle to get a 45-degree angle. The semicircle drawn earlier also cuts the ray AD. Let us call this intersection point E. With C as the center, draw an arc. With E as the center and using the same radius, draw another arc that crosses the previous arc. Let this intersection point be F. Draw a ray from A through F. This ray bisects . So, the angle is 45 degrees. This is one of the angles we need for our rhombus.
Step 2 — Constructing one rhombus
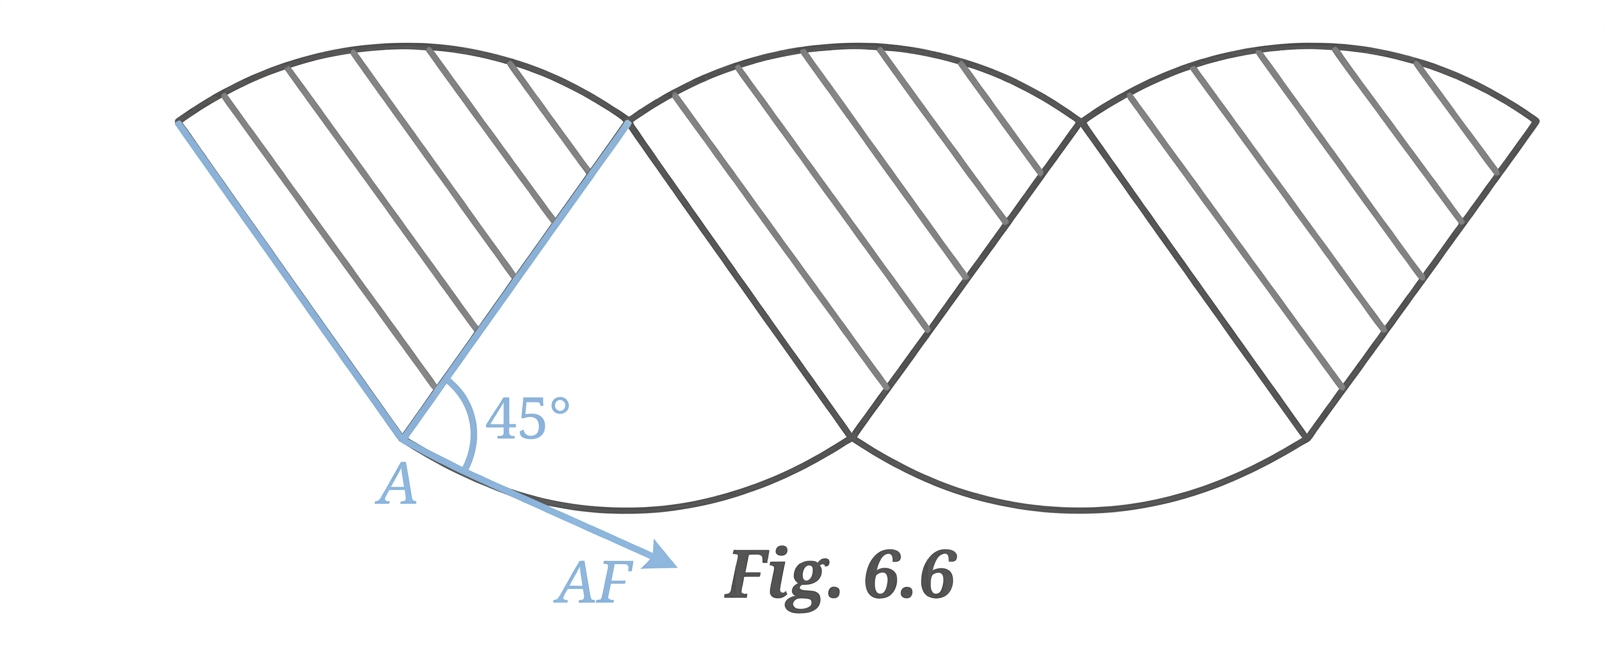
We have the angle degrees. This will be an interior angle of our rhombus. Let us choose a convenient length for the side of our rhombus. Let this length be . With A as the center, draw an arc of radius . This arc cuts the ray AC at a point. Let us call this point G. The arc also cuts the ray AF at a point. Let us call this point H. So, AG and AH are two sides of our rhombus, and their length is . Now, we need to find the fourth vertex of the rhombus. Let us call it I. With G as the center, draw an arc of radius . With H as the center, draw another arc of radius . These two arcs will intersect at a point. Let us call this point I. Join GI and HI using straight lines. Now, AGIH is one rhombus with all sides equal to and an angle of degrees at A.
Step 3 — Replicating the rhombus to form the figure
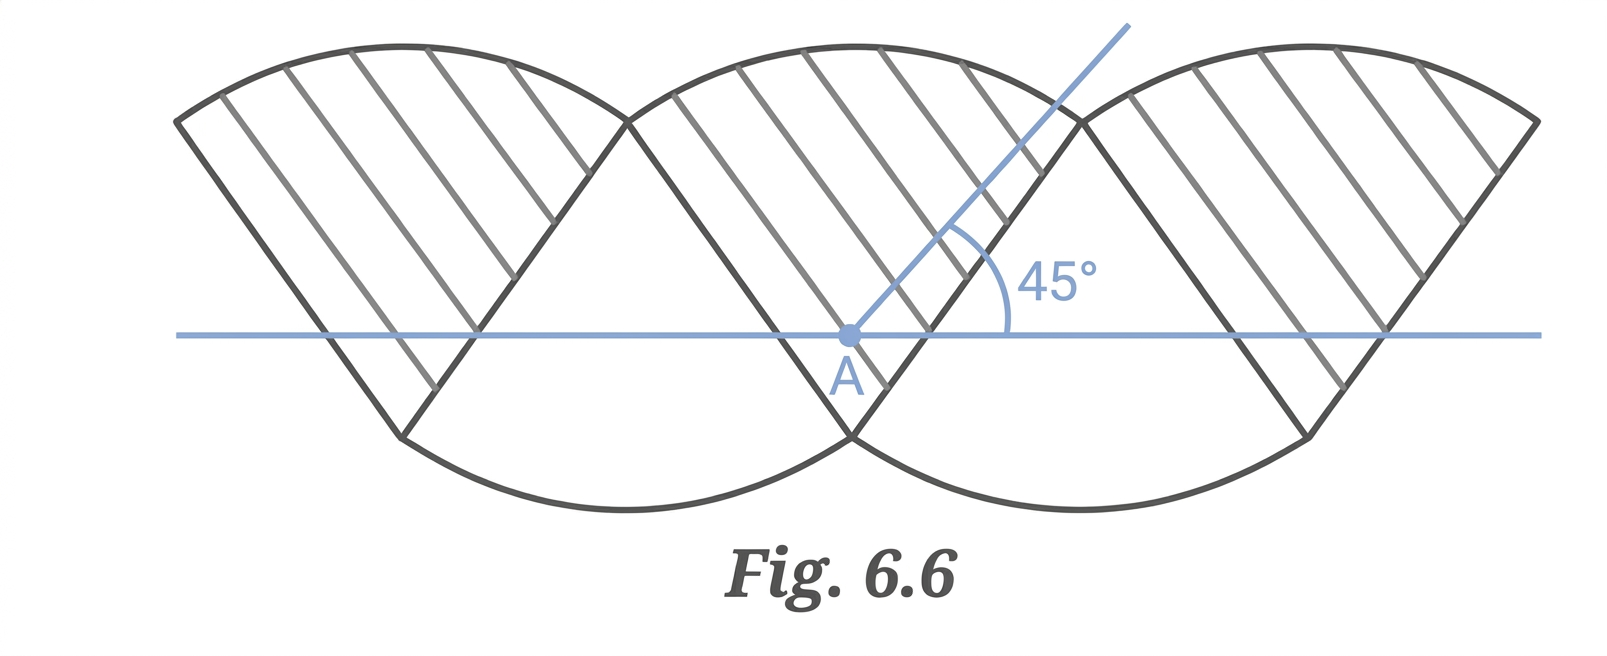
The given figure shows 5 rhombuses arranged side by side. The first, third, and fifth rhombuses are shaded. The second and fourth are unshaded. We have constructed one rhombus AGIH. Carefully erase any extra construction lines or arcs, leaving only the rhombus AGIH. Now, we need to create 5 copies of this rhombus. We can use tracing paper to make a template of the rhombus AGIH. Place the tracing paper over your constructed rhombus and trace its outline. Cut out this traced rhombus. This is your template. Place the template on a fresh sheet of paper. Draw around it to make the first rhombus. Since the first rhombus in the figure is shaded, shade this first rhombus completely. Now, rotate your template by degrees around point A (the common vertex). Place the rotated template next to the first rhombus, sharing the side AH (or AG depending on rotation). Draw around the template to make the second rhombus. This rhombus should be left unshaded. Rotate the template again by degrees around point A. Draw the third rhombus. Shade this rhombus completely. Continue this process, rotating by degrees each time, and alternating between shading and leaving unshaded. Draw a total of 5 rhombuses to match the given figure. The final figure will show 5 rhombuses, with the first, third, and fifth shaded, and the second and fourth unshaded.
More questions in IT
How do we find such A and B?
From X and Y, draw arcs above and below XY, with the same radii. The two points at which the arcs meet, above and below XY, give us A and B, respectively.
Use this to construct an eye.
In Fig. 6.1, join A and B with a line. Where does AB intersect XY, and what is the angle formed between them?
Will the line joining the two points at which the arcs meet, above and below XY, always be the perpendicular bisector of XY, i.e., when XY is of any length, and the arcs are drawn using a radius of any length?
Which two triangles should be congruent for AB to be the perpendicular bisector of XY (that is, O is the midpoint of XY and AB is perpendicular to XY)?
How do we get these different shapes? Try!
Will C and D lie on the perpendicular bisector AB?
Justify the following statement using the facts that we have established.
Any point that has the same distance from X and Y lies on the perpendicular bisector of XY.
Given a line segment XY, how do we draw its perpendicular bisector using only an unmarked ruler and a compass?
Can we extend the method of constructing the perpendicular bisector to construct a 90° angle at any point on a line? Draw a line and mark a point O on it. Construct a 90° angle at point O.
Find a segment of this line for which O is the midpoint.
How do we construct this figure?
What is the angle between two adjacent lines?
How do we construct a 45° angle using only a ruler and a compass?
Construct the following figure.
Draw an angle. Create a copy of this angle using only a ruler and compass.
How do we implement this idea using a ruler and a compass?
How did they make these arches?
Construct this arch shape on a piece of paper.
Let us think about the support lines this figure will need.
For symmetry, we should have , and . How would you construct these support lines?
Use these support lines to construct an arch. If required, adjust the radii of the arcs to make the arch look more aesthetically pleasing.
How do we construct this shape?
What supporting lines will you use to draw this arch?
Remember 'Wavy Wave' from the Grade 6 Textbook?
The supporting lines are just two line segments of equal length.
If their midpoints are marked, will you be able to construct a pointed arch?
How do we construct a regular pentagon (5-sided figure) and a regular hexagon (6-sided figure)? To begin with, try to construct a pentagon and hexagon with equal sidelengths.
Can we break a regular hexagon into smaller pieces that can be constructed?
Can six congruent equilateral triangles be placed together as in Fig. 6.12? If yes, will it result in a regular hexagon?
Consider this figure. Will the 70° angle fit into the gap? What is the gap angle ?
We have, .
Use this to determine whether the 70° angle fits the gap.
In Fig. 6.12 can you explain why AOD, BOE and COF are straight lines?
Construct a regular hexagon with a sidelength 4 cm using a ruler and a compass.
Context: We can construct a regular hexagon more directly if we can construct a 120° angle using a ruler and a compass.
Q. How do we do it?
Why is ? Is there an equilateral triangle here?
Construct a regular hexagon of sidelength 5 cm.
How will you construct 30° and 15° angles?
Construct the following 6-pointed star. Note that it has a rotational symmetry.
Are the six triangles forming the 6 points of the star — AGH, BHI, CIJ, DJK, ELK, FLG — equilateral? Why?
[Hint: Find the angles.]
Can a grid be tiled using multiple copies of tiles? We are allowed to rotate a tile and use it.
Can a grid be tiled using tiles?
What about a grid?
Complete the justification.
Is an grid tileable with tiles, if both and are even? If yes, come up with a general strategy to tile it.
Is an grid tileable with tiles, if one of and is even and the other is odd? If yes, come up with a general strategy to tile it.
Is an grid tileable with tiles, if both and are odd? Give reasons.
Here is a grid, with a unit square removed. Now, it has an even number of unit squares. Is it tileable with tiles?
Is the following region tileable with tiles?
Context: We are considering whether a given region can be tiled using tiles.
Q. What about this one?
Were you able to tile this? How can we be sure that this is not tileable? Can you find another unit square that, when removed from a grid, makes it non-tileable?
If the plain grid is tileable, is the black-and-white-grid tileable?
If the black-and-white grid is tileable, is the plain grid tileable?
Use this idea to find another unit square that, when removed from a 5 × 3 grid, makes it non-tileable?